Friday, March 24, 2017

7 Cost Saving Travel Tips from an Overtired Mama

For anyone who has followed the blog for any length of time, you know that it's clear that travel is a passion of mine.  I love it because it's an opportunity to make memories away from the things that sometimes interrupt memory making at home.  No work, no school... just you and your family.


Like many, I'm also very budget conscious.  I often hear snickers when I say that because we make a yearly trip to Orlando.   How could that be budget conscious?  Because I pride myself on being a travel bargain hunter.  I wanted to share some of my tips and tricks.  Keep in mind, not all of these tips are ideal for everyone so you have to keep in mind what are your "must haves" when it comes to vacation planning.

Tip #1 - Gifting "experiences" instead of "things".

My husband and I decided a long time ago that we would stop giving each other "stuff".  Now don't get me wrong, on occasion, we will purchase some small gifts, but we stopped saving up and buying multiple gifts at Christmas.  We have carried on this tradition with our daughter.  Although, full disclosure, we still buy her some gifts... more than we buy each other... but they are relatively small, and we usually try to stick to things she needs, like clothes or books, and a few small toys.

Instead of gifts, we use money that would have been spent on those things to set aside for our yearly vacation.  

Tip #2 - We do sacrifice other "small vacations" for the sake of our one "big one".

Think of any time during the year you travel for the weekend, a few days, or even just a night.  Think about how much you would spend on hotel and activities for those getaways.  By us giving up a couple weekends away, we save hundreds of dollars!  

Again, this is one of those tips that is not for everyone.  It's not easy waiting all year for that one getaway,  so it takes discipline.  We make up for it by planning little "staycations".  There are lots of things to do around your own city/town that you may not have thought of before.  It's a great way to learn more about where you live.

Tip # 3 - We share accommodations.

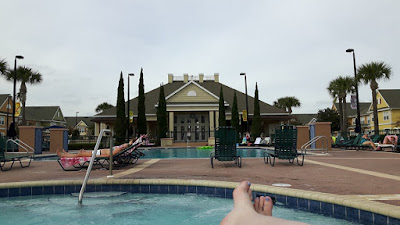
We've traveled with family on each of our vacations to Florida.  We rent a property through sites like AirBnB or VRBO and split the cost.   One of the property's we've gone back to consistently has 4 bedrooms, a games room, 3D TV, video games, private pool, hot tub, and more, and we spend less than what we would have for a hotel room.  

Just as an example, we traveled during March Break this year.  Hotel rooms with with 2 Queen Size beds in a 3 to 4 star hotel were going for roughly $150/night. The 4 bedroom house we rented was $110 a night.

The other advantage to renting a property is having your own kitchen.  I don't know about you, but as much as I like not being the one constantly cooking, I also get kind of tired of restaurants.  It's nice to be able to prepare our own meals.  Bonus - it's not frowned upon to eat in your bathing suit!


Tip #4 - We have a dedicated "vacation bank account".

I have a regular Canada Savings Bond withdrawal each paycheck that we use for our holiday.  You could also set up a savings account for this purpose and have automatic withdrawals from your checking account that coincide with your pay days.  If you haven't done this before, it's an adjustment.  I recommend starting with a small withdrawal each paycheck and gradually increasing it.  It's not as noticeable that way.

If that would be too disruptive to your current budget, there's another money saving option.  A change jar.   This requires discipline, also only works if you use cash  - I rarely carry cash these days, so it likely wouldn't work for me.  But, at the end of each day, you empty your change from your wallet/purse in to a change jar.  Everything.  Toonies, loonies, etc.  If you pay for your coffee with a 5 each day, all that change can add up.

You can also try other cost cutting measures like making coffee at home instead of buying it and setting aside the money you would have spent on coffee.

It all adds up!

Tip #5 - Research, research, research.

For many people I have talked to, this can often be the least enjoyable tip I share.  I search airline websites, Expedia, VRBO, Priceline and many other websites frequently.  Several times a week.  I keep an eye on trends, and I'm ready if a flash sale comes up, I'm ready to pounce.  Prices can change daily, so it may sound like overkill, but sometimes it pays off.

For our most recent trip, I searched on a Monday morning at flights from our home airport in Saint John, New Brunswick to Orlando, and the flights were hovering around $600 round trip.  Tuesday evening at 11 PM, I found flights for $369 round trip, taxes included.  Amazing.  You never know what you may find!

Some general tips - I have found the best dates to fly are Tuesdays and Wednesdays.  The best prices I have found, I have found when searching on a Tuesday, Thursday or Saturday.  It goes without saying that if you can travel outside of holidays, you will get a better deal.  If you can leave a few days before and come back a few days after a holiday, that's one way to cut down on the price of a trip over the holidays (Christmas/March Break).
- For rental cars - if you are not travelling at a popular time (Christmas, Thanksgiving, March Break), I have found the best prices 2 to 4 weeks before your trip.  As someone who plans in advance, this is a difficult wait, but it has paid off many times for me.  Also, search out discount coupon codes.  A simple google search will bring them up, but beware of the fine print.  If you're using a code that requires you use a Visa, they can charge you a higher price at check-in if you decide to pay with a different card.  Also make sure that the coupon is not for particular employers, unless you work there.

Tip #6 - Be as flexible as possible.

When I plan a trip, I have a general idea of when we want to plan, but I always make sure I'm flexible within a day or two for either side of my travel dates.  That way, if we find a great deal that are different than our intended dates, we can make changes.

Even better, if you are flexible on a destination, you can sometimes get amazing last minute travel deals.

Tip #7 - Use your travel rewards wisely.

If you're like me and use travel rewards towards your trips, be sure to compare how many rewards points/miles you need to use for your "reward" versus how much you would pay cash.  As an example, When we were considering whether to use our AIR MILES® towards a rental car or flights, it ended up that it would cost us 3 times as many miles to redeem for a rental car (we were travelling during a time of high demand) than one of our airline tickets, and if we were paying cash, they were roughly the same price.

Another tip - Flights leaving from Canada are expensive.  You can get some amazing deals in the US.  So we used our AIR MILES® to fly from our home airport to a US hub airport (Chicago O'Hare), and were able to get a flight from O'Hare to LAX for $49 Canadian, taxes included with United!  


I also keep an eye on "bonus offers" to earn more AIR MILES®.  I answer surveys, I go through airmilesshops.ca to purchase from websites I generally would shop from anyway, and I pay with my AIR MILES® card and pay it right off to earn miles on my regular purchases.  Bonus offers exist for other travel rewards programs too, so be sure you're familiar with your program!


Those are some of my general tips and tricks.  I would love to hear any you have!  Feel free to share in the comments below, or come chat with me on social media!  Follow me on Twitter at @overtired_katie or on Facebook at The Ramblings of an Overtired Mama.

Wednesday, March 22, 2017

Hair & Makeup Tutorial and Product Review

I know... an "Overtired Mama" doing a hair and makeup tutorial.  I can't believe it either.

I've watched many hair and makeup tutorials and thought "I wish I could do all of that".  But alas, even the simplest makeup tutorial has me coming out looking like I just applied clown makeup or had a 4 year old do my eye liner.

If you are someone who is seasoned when it comes to applying makeup, this tutorial will not be for you.   I'm a makeup minimalist.  And when I say that, don't mistake it for a snobby or snarky comment.  It's not that I don't like makeup, I actually like wearing it, I'm just not very good at it.  Oh, and I also love sleep way to much - I would give up a 10 minute makeup routine if it meant 10 more minutes in bed.  I'm that bad.

Anyway, I made a few changes over the last few months to the way I do my hair and makeup.  While I still don't wear makeup every day, there are times that I really need to, so these are my quick and dirty tips and tricks.  Below is a video that will take you through my routine. Then I will review each of the products I used individually.


Milkshake Color Maintainer Shampoo and Conditioner

I was introduced to this product by a childhood friend who is now a hair dresser.  She told me I would love this shampoo and conditioner, and she wasn't kidding.

The first thing you will notice is the amazing smell.  It's like smelling cupcakes that have been placed right in front of your nose.  So good!  Warning: may make you hungry.  But even though the smell is amazing, once you're done in the shower, the smell isn't strong.  I say that because I know many work places are scent free these days, so people are nervous about whether the smell will linger.  It really doesn't.  If I pull my hair right up to my nose to smell, I can get a really faint scent, but someone would have to be pretty close to you for that to happen.

My hair also has also had noticeable changes since I started using this shampoo and conditioner.  It's got a shine to it, and again, very soft.

Milkshake has a number of products including purple shampoo and styling products.  Sales of these products are generally limited to beauty salons, and even at that, they aren't available at every salon, so they can be hard to come by.  I have found some websites that sell them, so it may take a little searching to find them.

A bottle of shampoo generally runs for approximately $22*.

Pantene BB Creme


I seriously love the way my hair feels every time I use this product.  You would think that would motivate me to use it every time, but unfortunately, I don't always use it.  This product has many benefits, including heat protection, anti-frizz, and moisturizing components.  What I love about this product is that my hair feels so soft and manageable when I use it.  I live in an area where we have a lot of fog and it helps manage the frizz that type of weather produces.

Purchased for $6.*

Moroccan Oil Heat Styling Protection


I've had many a hair stylist gasp in horror when I said that I didn't use any product in my hair, not even a heat protection product.  Well stylists, worry no more!  I'm sold on this Moroccan Oil Heat Styling Spray.  Not only does it protect my hair from the high heat of my hair dryer and hair straightener, it tames my fly aways that seem to always pop up  through out the day and helps keep my hair in place.  Not quite a hair spray, but does help a little with my style.

Purchased for $21.*

TRESemmé Dry Shampoo


While I didn't mention this product in my video, I thought I would include it in my review anyway.  There are days that I wake up late and just need to run out the door.  That being said, I have combination hair (dry at the tips, oily at the roots).  So, it doesn't take long for the oil to take over the roots of my hair.  If I go beyond a day and a half without a shower, it's noticeable.  My friends have been raving about dry shampoo for a while.  I experimented with some, but TRESemmé's dry shampoo is the first one that helped control the oil in my hair.  In a pinch, I can use this as I head out the door.  I simply part my hair in a few different spots, lift a small layer at each part and spray underneath the layer , near the root and it keeps my hair looking fresh!

Purchased for $6.99.*

L'Oreal Paris Ultra Even Lotion

I have really dry skin, especially in my "T-Zone" area (above my eyebrows down on to my nose).  I don't exfoliate as often as I should, and I need regular moisturizing.  This product makes my skin feel and look great, and it has SPF 15, which is great because an important part of great skin is protection from UV rays!

Purchased for $7.99.*

e.l.f. Hydrating Face Primer

I'm new to makeup primers.  Some may use this instead of a moisturizer before applying makeup, but I use both.  This smooths my skin's surface and helps set my makeup.  You don't need much to apply, a little goes a long way.

Purchased for $5.99.*

Super C.C. Cream by Physicians Formula

I'm also new to Physicians Formula makeup.  I decided to give it a try, as I'm always experimenting with new products.

Again, it doesn't take much to go a long way.  I didn't breakout with this makeup.  It went on easily and stayed on, but was easy to remove as well at the end of the day.

Purchased for $13.99.*

Physicians Formula Super CC Color-Correction + Care Instant Blurring Eye Cream

This is also the first time I tried an under-eye makeup (a lot of "firsts" for me in this review).  I had been using concealer to disguise the darkness under my eyes, but this cream works so much better.  It really covers the darkness well, and the cool applicator tip helped reduce the puffiness under my eyes.

Came free with the Super CC Cream.*

Mabeline Color Show Eyeliner

As mentioned in my video, I haven't been wearing eyeliner very long.  I've always been nervous putting things that close to my eyes.  I'm still not great at it, and I have a shaky hand, so that just makes it even more difficult.  I tried a liquid liner, but you really need a steady hand for that.  This pencil is perfect because it's easy enough to erase if you make a mistake, but it glides easy for those of us who have difficulty putting liner on.

Purchased for $2.99.*

Wet n Wild Max Volume Mascara

I'm not usually seeking volume for my lashes, just colour, but I do like this mascara.  The brush has great bristles that separate your lashes to give them lots of definition.

Purchased for $5.99.*

Avon Marbelized Baked Eye Shadow - Rose Gold

I'm not one for wild colours for my eyes, so this is the perfect shade for me.  It's sort of a pink/purple that is perfect for a daytime look.

Purchased for $4.*

Avon Be Blushed Cheek Colour

I'm all about simple makeup.  The easier it goes on the better.  That's why I love this cheek colour.  A stick similar to lipstick, but just a little thicker.  Apply directly to your upper cheek and blend.  Some people use it for lip colour too, but I haven't tried that.  I do find that since the texture is thicker than a powder, when you blend it makes the colour look deeper than it is.  Give it a minute before you panic and start taking it off.

Purchased for $9.*

And that's it!  Feel free to leave any comments, questions or recommendations!  As mentioned, I'm not the most versed in makeup, so if you know of a product that is simple to apply that you think I should try, let me know!

* Note: Prices were at time of publication.  Some items I purchased on sale.  Please see your local supplier for up to date pricing.


7 Tips for Summer Travel on a Budget

Winter is over (although, I know for some, it feels like it's still here).  We are now approaching summer.  We're on the "downw...